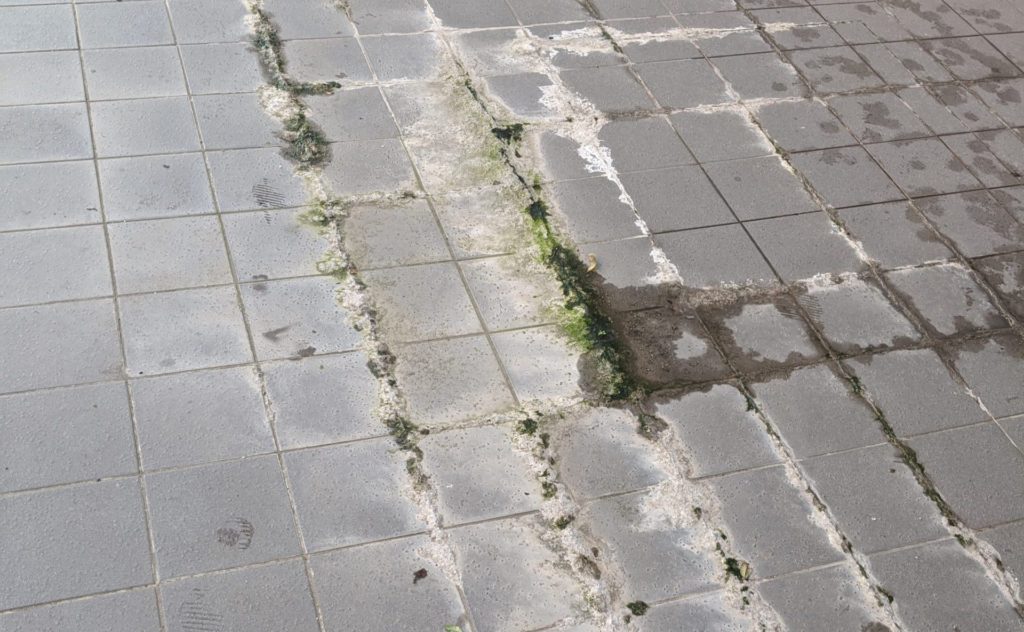
We all know the problems of direct stick tiles and waterproofing on external balconies and roof decks. Replacing a cracked tile can compromise the waterproofing, requiring the replacement of the whole area. Re-grouting can cause similar problems. And when a leak in the waterproofing occurs it is difficult to find and near impossible to repair, usually resulting in major replacement works.
What if there was an easy way to solve these problems with little difference in cost? What if this solution gave you advantages beyond making failures easy to locate and repair? What if, in some cases, this solution made the cost of your build cheaper?
The solution is pedestals! Sometimes called pods, Buzons, paver supports, or VersiPave, pedestals provide an enormous array of benefits with few downsides.
What are pedestals?
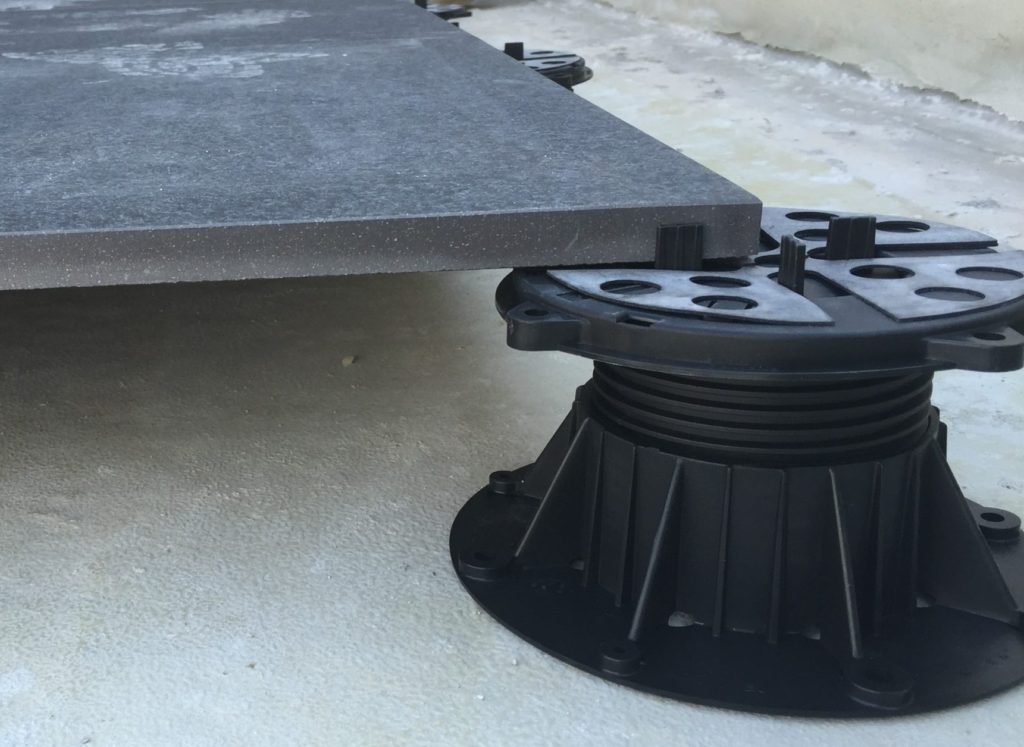
Pedestals are plastic assemblies typically consisting of a wide base, a height-adjustable mechanism, and a mounting assembly to suit the surface finish. Made predominately from recycled plastics, they are a sustainable solution to paver and deck installation.
The wide base of pedestal systems spreads the finished floor load over a large area and are often capable of accommodating loads up to 1,000kg. Being round they do not penetrate or compromise waterproofing membranes and prevent ponding. These bases can also have slope correctors built in to compensate for falls in the substrate from 0-5%.

The height adjustment mechanisms are usually threaded allowing for infinite adjustment. With the addition of extension pieces, heights can be progressively incremented from as little as 12mm to over 1 metre. The addition of a locking ring secures the desired height into the future.
Mounting assemblies are as varied as the heights of the pedestals. When used with suitable tiles or pavers the mounts come with spacer tabs ranging from 2mm to 10mm. These tabs create positive drainage while eliminating uneven grout lines and preventing efflorescence. Variable spacer tabs allow pedestals to support up to 6 pavers with different corner angles. You can even utilise joist hangers to make building a deck a simpler, faster process.
Complete pedestal systems can include other attachments to aid installation and create the perfect finish. Wall spacers can be used to keep the paver off the walls or upstands to allow for expansion, contraction, and paver movement due to traffic. EPDM shims can be installed to act as a shock absorber, to prevent paver slip, and to compensate for stone thickness at installation. And wind uplift retainers can be utilized on exposed installations to increase wind uplift resistance.
The problems of waterproofing and traditional tile installation?
To show how pedestal systems improve on traditional tile installation, we need to start at the substrate and its subsequent waterproofing. It’s at this level where most waterproofing failures occur. In our experience, this is also where most non-compliance issues begin.
AS4654.2 is the Australian Standard for the design and installation of external, above-ground waterproofing membranes. Balconies, terraces, and roof decks need to be designed & built using this standard as a minimum target. All too often we find this standard is either not known or entirely ignored at many stages of the build process. From design, through construction, and even at the final inspection, the requirements of this standard are often not met.
In most cases, a balcony or roof deck is initially constructed from concrete, plywood, or cement sheet style products on a level plane. This plane is usually set down an arbitrary amount from the internal floor or a hob in installed at the threshold. At this point box gutters or leak control (puddle) flanges are installed. In some cases, a waterproofing membrane is installed at this point. The area is then screeded to achieve the minimum 1:100 fall as required under AS4654.2 prior to the final waterproofing and tile installation. And this is where the problems begin!
The most common non-compliance issue we see in traditionally tiled balconies today is related to vertical termination heights. Designers, builders, and waterproofers, who have often never seen a copy of AS4654.2, assume their arbitrary set down to the waterproofing is enough, and then proceed to install tiles to a near level entry to the internal floor level. Appendix A of the standard determines a membranes minimum vertical termination from the finished floor level. The big detail here is “finished floor level”, not where the membrane sits. This minimum vertical upward termination starts at 40mm for an N1 wind zone and incrementally increases to 180mm for an N6 wind zone. This means the membrane must finish, at its lowest, 40mm above the top of the highest horizontally laid tile.
There is a solution provided in figure 2.9 of the standard which allows for traditionally installed tiles with a level entry. This requires a gutter be formed in the substrate along the edge of the door/window frame, a grate drain installed, and the remainder of the area to fall away from the grate. I can count on one hand the number of times I have seen this solution implemented since the standard was released in 2009. I need more fingers to count the number of times I have seen this vertical termination height requirement broken or ignored in the last 2 weeks.
The next most common issue is termination into leak control flanges. The standard details the waterproofing membrane terminating into the flange and adhering to the complete outer rim of the flange. Most screeds are 20mm in thickness or greater at the puddle flange, and typically cover the entire outer rim. Many people assume that because they installed a membrane under the screed that they are compliant, but that is rarely the case. The standard requires membranes to be fit for purpose. If a membrane is installed with less 1:100 fall not only is it non-compliant with the standard but to achieve product warranty compliance it must also be suitable for permanent immersion. Very few membrane systems on the market today meet that simple requirement.
Finally, the standard requires the installation of fillets at the vertical-horizontal interface. These fillets are almost universally ignored where traditional tiling will occur as the fillet interferes with the skirting tile installation resulting in unsightly caulk joins. The elimination of these fillets results in an improved aesthetic finish at the expense of long-term membrane performance.
Traditional tiling also requires the tiles to achieve a minimum level of adhesion to the membrane over which they are laid. This requirement for adhesion limits the range of membranes available for installation. It often eliminates some of the most elastic, high-performance membranes from being used which means substrate issues will almost certainly result in membrane failure.
Unfortunately, it is commonly recognised that over 80% of building defects are waterproofing related. Many of these defects stem from non-compliance with AS4654.2 in order to achieve an aesthetic finish. Most of these issues can be solved by the use of pedestals.
The solution? Pedestals!
But how you ask? And what other benefits do they provide? For starters, pedestals are not limited to using tile adhesives to bond to a substrate, if you need to bond them at all. If, for any reason, a pedestal is required to be bonded to a waterproofing membrane an appropriate adhesive like polyurethane or epoxy is readily available – often from the local hardware store! This allows the selection of the best possible waterproofing membrane for the job, not limiting it to one compatible with a specific tile adhesive.
Using pedestals allows you to easily create a level deck area without compromising the standard. As the spacer tabs are providing positive drainage, they have effectively become a grate. The pavers are no longer the finished floor level returning that status to the highest point of the waterproofing membrane. Because the pavers are installed level the substrate below can also be built with greater fall which evacuates any water faster, lessening the chance of leakage. There are many unintended consequences of a now level deck, including no more rocking chairs and tables, no more dirt and debris piling up in a single place, and your ice-cold drink won’t start sliding across the table in summer. It’s also visually stunning when there is no longer a skirting tile!
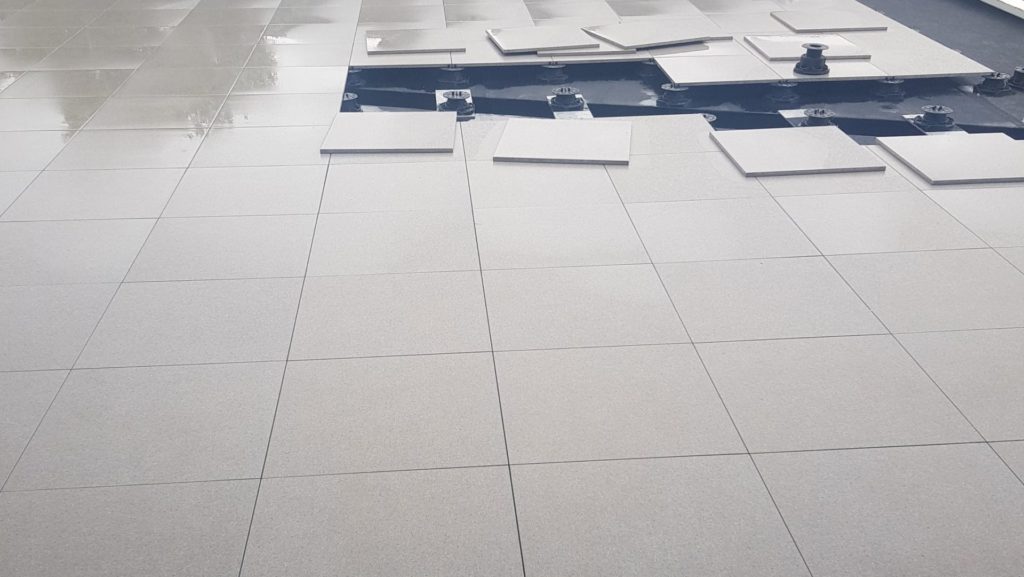
There is never a need to use a “sandwich” membrane system with a screed when using pedestals. The screed can be installed to achieve the desired fall, levelling out at the external rim of the puddle flange. This allows a single, high-quality waterproofing membrane to be installed, properly terminated into drains. And given how easy it is to remove pavers the membrane can be inspected regularly (as is often required under materials warranties) which is impossible using traditional methods.
Finally, fillets are no longer a problem. Use that 40mm fillet and eliminate issues of shear movement causing tears in the membrane and know it will never interfere with the finish of the deck.
What other benefits does a pedestal give?
- Ease of tile removal and replacement when required.
- Makes it easy to conceal services under the deck, and just as easy to access them again for maintenance.
- The air gap between the paver and the substrate allows for ventilation and improved heat insulation. It also reduces sound transmission to the room below!
- Reduces weight on the structure by eliminating adhesive bed.
- Eliminates efflorescence and algae growth in grout lines.
- Fast, simple installation!
Now that you know the benefits, you’ll understand why we always recommend the use of pedestals in place of traditional tiling over any of the waterproofing membranes we install. So when you begin your next project, talk us at the start about the best waterproofing solution to achieve your goals, and how best to utilise pedestals to create that perfect finish.
References
https://www.ausdrain.com/products/buzon-pedestals/paving-decking
https://www.outdure.com/products/deck-jack-pedestals/
https://elmich.com.au/products/versipave-2/
https://infostore.saiglobal.com/en-au/Standards/AS-4654-2-2012-120284_SAIG_AS_AS_252120/